Updating your motherboard’s BIOS firmware may seem daunting, but it’s a straightforward process that can significantly improve your system’s performance and compatibility. In this guide, we’ll walk you through how to update BIOS firmware in your motherboard using simple steps, whether through Windows or a USB drive. Whether you’re upgrading to support new hardware or fixing bugs, this guide covers everything you need to know for a safe and successful update.
By the end of this article, you’ll understand the difference between BIOS and UEFI, why updating your firmware is important, and the exact steps for both Windows and USB methods. You’ll also learn how to backup your current BIOS to avoid risks during the process. Let’s get started and optimize your PC’s performance with a BIOS update!
What is BIOS Firmware and Why Should You Update It?
BIOS (Basic Input/Output System) is a small piece of software built into your computer’s motherboard. When you turn on your computer, BIOS wakes up your hardware—like the memory, hard drive, and keyboard—to check that everything’s working properly. Then, it hands things over to the operating system, like Windows, to finish starting up your PC.
In recent years, many computers have switched from BIOS to UEFI (Unified Extensible Firmware Interface), a more modern version with better performance, security, and ease of use. Both BIOS and UEFI do the same basic job, but UEFI is becoming the new standard for most modern computers.
Differences Between BIOS and UEFI Firmware?
Firmware is special software designed to control hardware devices like your computer’s motherboard, router, or smartphone. It helps your hardware talk to your operating system and make sure everything runs smoothly.
Firmware is usually stored in the device’s memory and doesn’t get updated as often as regular software. However, just like any software, it sometimes needs an update to improve performance or fix bugs.
So, when you update your BIOS or UEFI, you’re updating the firmware that controls your motherboard.
Why BIOS Updates Are Important?
A BIOS update plays a critical role in ensuring the motherboard can communicate effectively with newer processors. Here’s why keeping the BIOS updated is essential for B550 motherboards:
Futureproofing
With AMD’s commitment to long-term support for AM4, a BIOS update ensures the motherboard stays relevant and capable of supporting future processors within its chipset limitations.
Processor Recognition
BIOS updates include the microcode required for the motherboard to recognize and optimize the performance of newer processors like for example the Ryzen 5000 Series or Ryzen 4000 G-Series.
Bug Fixes and Stability Improvements
Updated BIOS versions often resolve compatibility issues, improve system stability, and address known bugs. For example, early BIOS versions may have memory overclocking issues that are resolved with newer updates.
Unlocking New Features
Some BIOS updates enable additional features like improved memory compatibility, better overclocking stability, or enhanced PCIe performance.

Now that you understand the basics, let’s dive into how to update your motherboard BIOS or UEFI!
How to Update BIOS Firmware in Your Motherboard via Windows
Method 1: Updating BIOS or UEFI Through Windows
One of the easiest ways to update your BIOS or UEFI is directly through Windows. Here’s how:
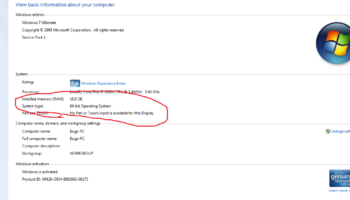
Step 1: Find Your Current BIOS/UEFI Version
Before updating, you’ll need to know which version you’re running. You can find this by entering the BIOS/UEFI setup when you start your computer or by using system information tools like CPU-Z or Speccy.
Step 2: Check for Updates
Visit your motherboard manufacturer’s website and search for BIOS or UEFI updates for your specific model. Make sure to download the right update for your hardware.
Step 3: Prepare for the Update
Before you update, close all open programs and temporarily disable your antivirus software, as it might interfere with the process.
Make sure your computer is plugged into a reliable power source, and don’t restart or shut down during the update.
Step 4: Run the Update
If the manufacturer offers a Windows-based update tool, simply double-click the downloaded file and follow the instructions. The tool will guide you through the process.
Step 5: Restart Your Computer
Once the update is finished, your computer will likely restart automatically. If not, restart manually.
Step 6: Verify the Update

After your computer restarts, enter the BIOS/UEFI setup again to confirm that the update was successful. If needed, adjust your settings to match your preferences.
How to Update BIOS Firmware in Your Motherboard Using a USB Drive
Method 2: Updating BIOS or UEFI Through a USB Drive
If updating through Windows isn’t an option, you can also update your BIOS or UEFI using a USB drive. Here’s how:
Step 1: Download the Update
Go to your motherboard manufacturer’s website, find the latest BIOS/UEFI firmware for your motherboard model, and download it.
Step 2: Format a USB Drive
You’ll need to format your USB drive as FAT32. You can use tools like Rufus or even some manufacturer utilities to make the drive bootable.
Step 3: Copy the Firmware File
Move the firmware file to the root directory of the USB drive (the main folder, not inside any subfolders).
Step 4: Boot from the USB Drive

Insert the USB drive into the computer, restart it, and press the key to enter the BIOS or UEFI setup (usually F2, F10, or Delete). From the boot menu, select the USB drive.
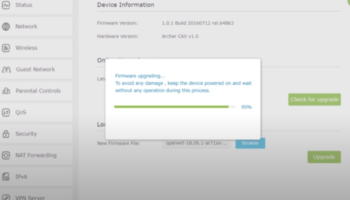
Step 5: Run the Update
Follow the on-screen instructions to update the firmware. Make sure you don’t turn off your computer or remove the USB drive during the update. Once done, restart your computer.
Why Backing Up Your BIOS Firmware Before Updating is Crucial
Before making any updates, it’s critical to backup your original BIOS or UEFI firmware.
If something goes wrong, a failed update can cause major issues, even making your computer unusable. Most manufacturers provide tools to help you back up the firmware, so check their support website for details.
Final Thoughts: Proceed with Caution
Updating your BIOS or UEFI can bring big improvements, but it also comes with some risks if done incorrectly. Always double-check that you’re following the manufacturer’s instructions carefully. If you’re unsure, you can always reach out to customer support or consult with a professional.
Now that you know how to update your motherboard’s BIOS firmware, you can confidently take your computer’s performance to the next level!
Frequently Asked Questions in Updating Motherboard BIOS
1. What happens if I don’t update my BIOS firmware?
If you don’t update your BIOS firmware, you may experience compatibility issues with new hardware or miss out on performance improvements and bug fixes that can enhance your computer’s stability.
2. How often should I update my BIOS firmware?
You should update your BIOS firmware only when necessary, such as when the manufacturer releases an update to fix bugs, improve hardware compatibility, or enhance system performance.
3. Can updating BIOS firmware damage my motherboard?
While rare, an interrupted or failed update can cause issues with your motherboard. Always follow the instructions carefully, ensure a stable power source, and back up your current BIOS before updating.
4. Do I need to reinstall my operating system after a BIOS update?
No, updating your BIOS firmware does not require reinstalling your operating system. The update process only affects the firmware controlling your motherboard, not the OS.
5. Can I skip BIOS updates if my computer is running fine?
Yes, if your system is stable and performing well, it’s generally safe to skip BIOS updates. Only update if you’re encountering hardware issues or need new feature support.


